> For the complete documentation index, see [llms.txt](https://shoppad.gitbook.io/uploadery/llms.txt). Markdown versions of documentation pages are available by appending `.md` to page URLs; this page is available as [Markdown](https://shoppad.gitbook.io/uploadery/readme/displaying-an-upload-field-on-a-product.md).
# Displaying an upload field on a product
Before customers can upload files, you need to tell Uploadery which products the upload field should appear on. You do this through the assignment section of your option set.
This guide walks through each assignment option so you can choose what works best for your store.
***
### Step 1: Open the Assignment Section
Open an existing option set or create a new one. At the top of the option set, you'll find the assignment section. This is where you define which products will display the upload field.
### Step 2: Choose How to Target Your Products
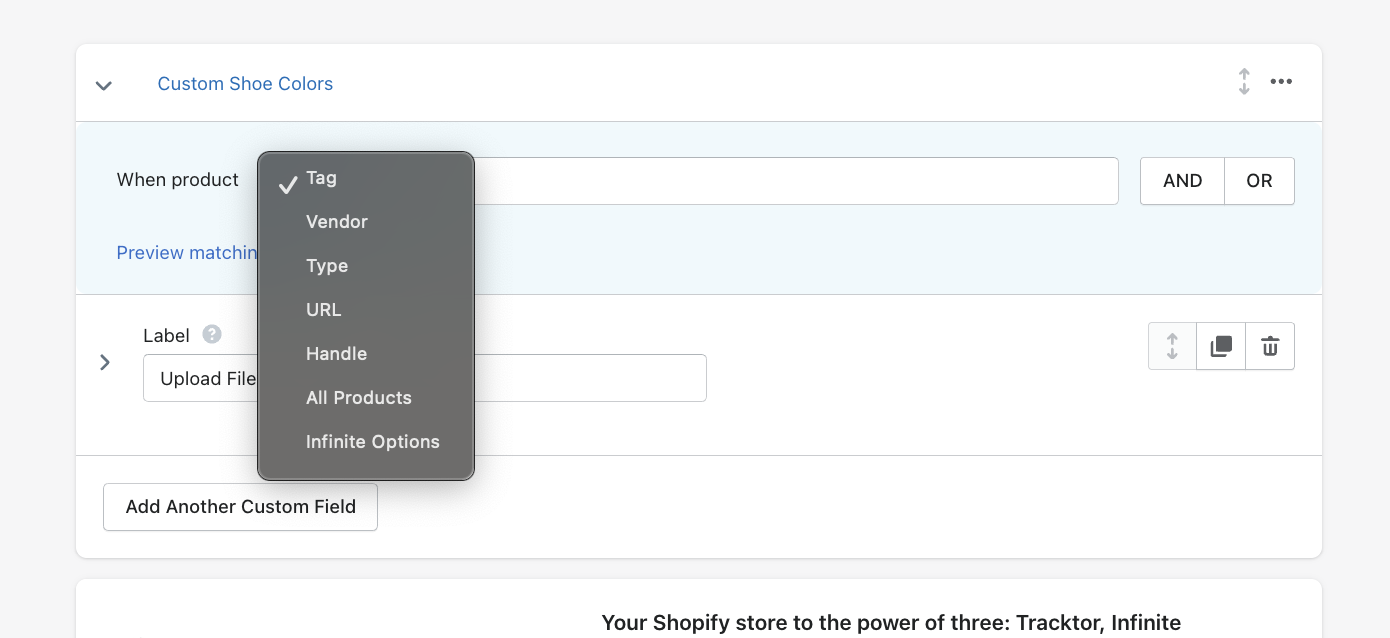
Use the dropdown to select an identifier. An identifier is just the method you're using to tell Uploadery which products to include.
### Here's what each one does:
**Tag** -- Assigns the upload field to any product with a specific Shopify tag. This is the most flexible option and works well for larger catalogs or when products don't share a vendor or type.
**Vendor** -- Assigns the upload field to all products from a specific vendor in your catalog.
**Type** -- Assigns the upload field to all products that share a specific product type.
**URL** -- Assigns the upload field to one specific product using its full product URL. Best for one-off assignments.
**Handle** -- Similar to URL but uses just the last part of the product URL instead of the full address. For example, if your product URL is `https://your-store.myshopify.com/products/shirt`, the handle is `shirt`.
**All Products** -- Displays the upload field on every product in your store.
**Infinite Options** -- Lets you conditionally display an upload field based on a selection a customer makes in Infinite Options. For example, if a customer chooses "Custom Engraving" as an option, an upload field can appear asking them to submit their artwork. This requires the Infinite Options app to be installed.
### Step 3: Enter the Matching Value
After selecting your identifier, type in the value you want to match. For example, a tag name, vendor name, or product handle.
Uploadery will show you how many product pages match your rule below the field, so you can confirm it looks right before saving.
### **Step 4: Add AND / OR Rules (Optional)**
If you need more control, you can add additional conditions using AND or OR.
**AND** narrows the results. The upload field will only appear on products that meet every condition. For example, a product needs the tag "color" AND the tag "t-shirt" for the upload field to appear.
Pre-order **AND** add-on = 1 matching product
**OR** broadens the results. Think of it like a comma in a list. If you want the upload field to appear on Product A, Product B, and Product C, you'd connect them with OR rules. Products tagged "preorder" OR "add-on" will both display the upload field.\
\
Products tagged with preorder **OR** add-on = 4 products
This allows you to fine-tune exactly where the upload field appears.
### **Step 5: Save**
Click **Save.** Your upload field will now appear on the matching product pages.
If the upload field isn't showing up after a few minutes, make sure you've turned on the Uploadery app embed in your theme. Head here if you need help: [Turn on Uploadery for Your Theme](https://shoppad.gitbook.io/uploadery/readme/pages/zo3fp8GWqsQ1bUTtM9dn#installing-uploadery-on-a-2.0-theme)